Overview
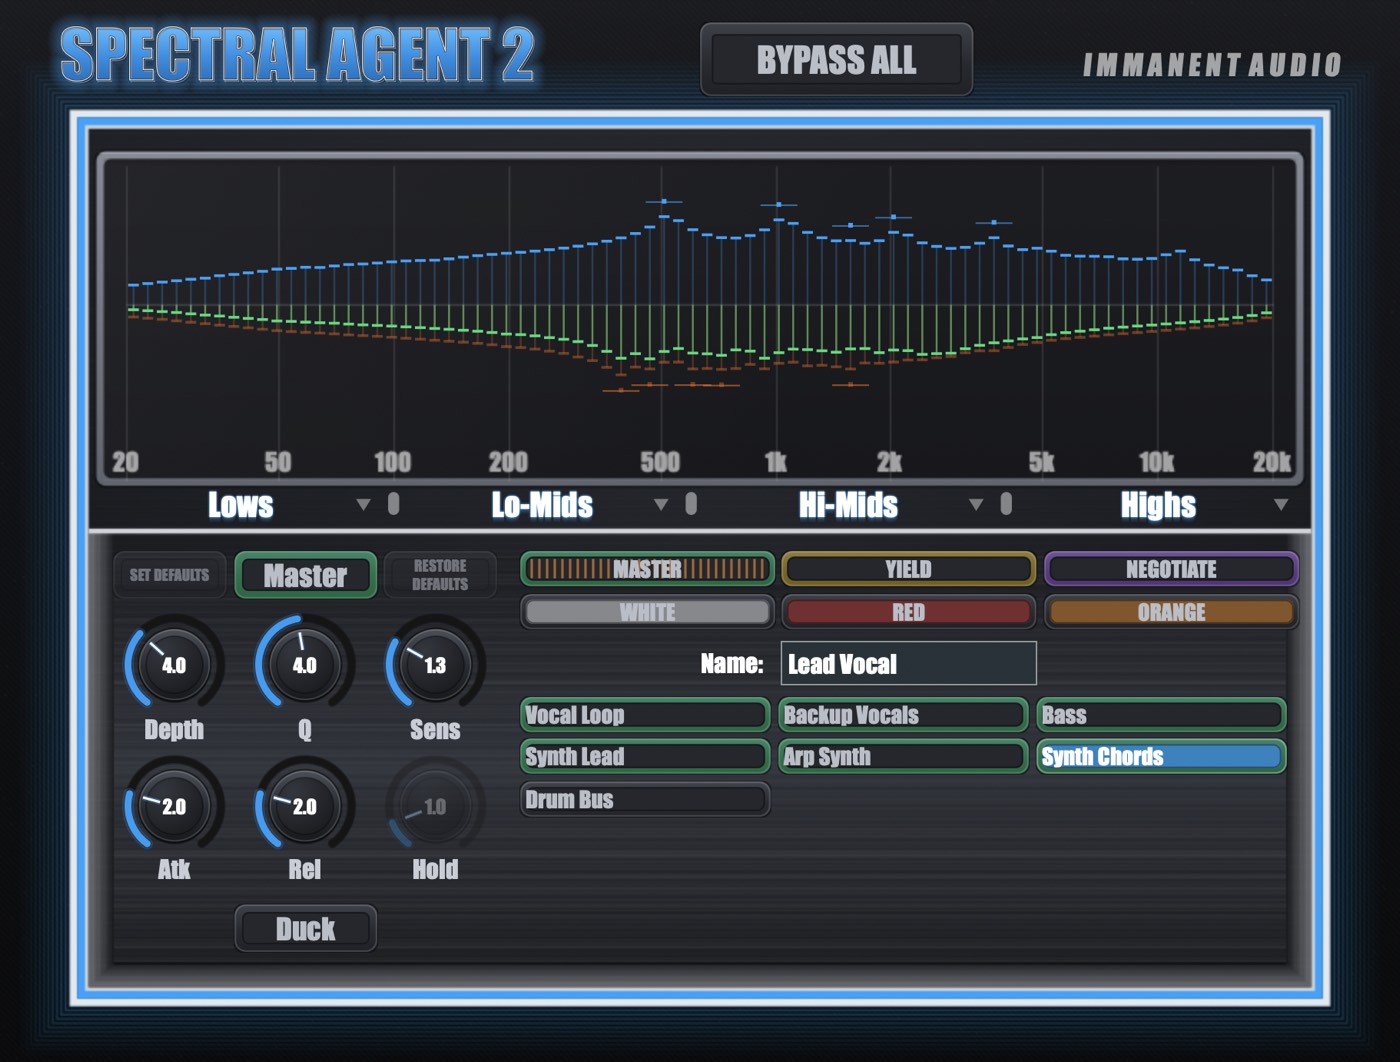
Spectral Agent 2 goes on every track you want involved, and every instance is interconnected. You set the priority between tracks. When they both peak on the same frequency, the prioritized track wins and the other track dips until the frequency collision is over.
- Nothing is cut when nothing collides. Two tracks that never share a frequency at the same instant never touch each other. Between clashes every instance is transparent.
- Relationships are per-pair. One track can be the priority over the bass, yield to the lead vocal and negotiate with its own double at the same time, with separate settings for each.
- It reports zero latency. Nothing is delayed. Safe to record through and use live.
- Up to 64 instances in one session, and every relationship is saved with the project.
When to use it
Lead vocals buried in a dense mix, kick and bass crowding each other, doubled or layered synths, stacked guitars, keys against a rhythm section, dialogue over music. Any situation where two elements sound good on their own, but muddy together.
Getting started
Put it on two competing tracks as an initial test — a lead vocal and lead instrument is a good starting place.
- Insert an instance on both tracks.
- On the vocal instance, select the instrument's track button (bottom right), and change the dropdown to Master. The vocal is now the priority in that pair.
- Play the section and watch the analyzer. Green shows the post-processed curve, after cuts have been made.
After you get a sense for what the plugin does, you can start to build out the Master/Yielding relationships in the rest of the mix.
The modes
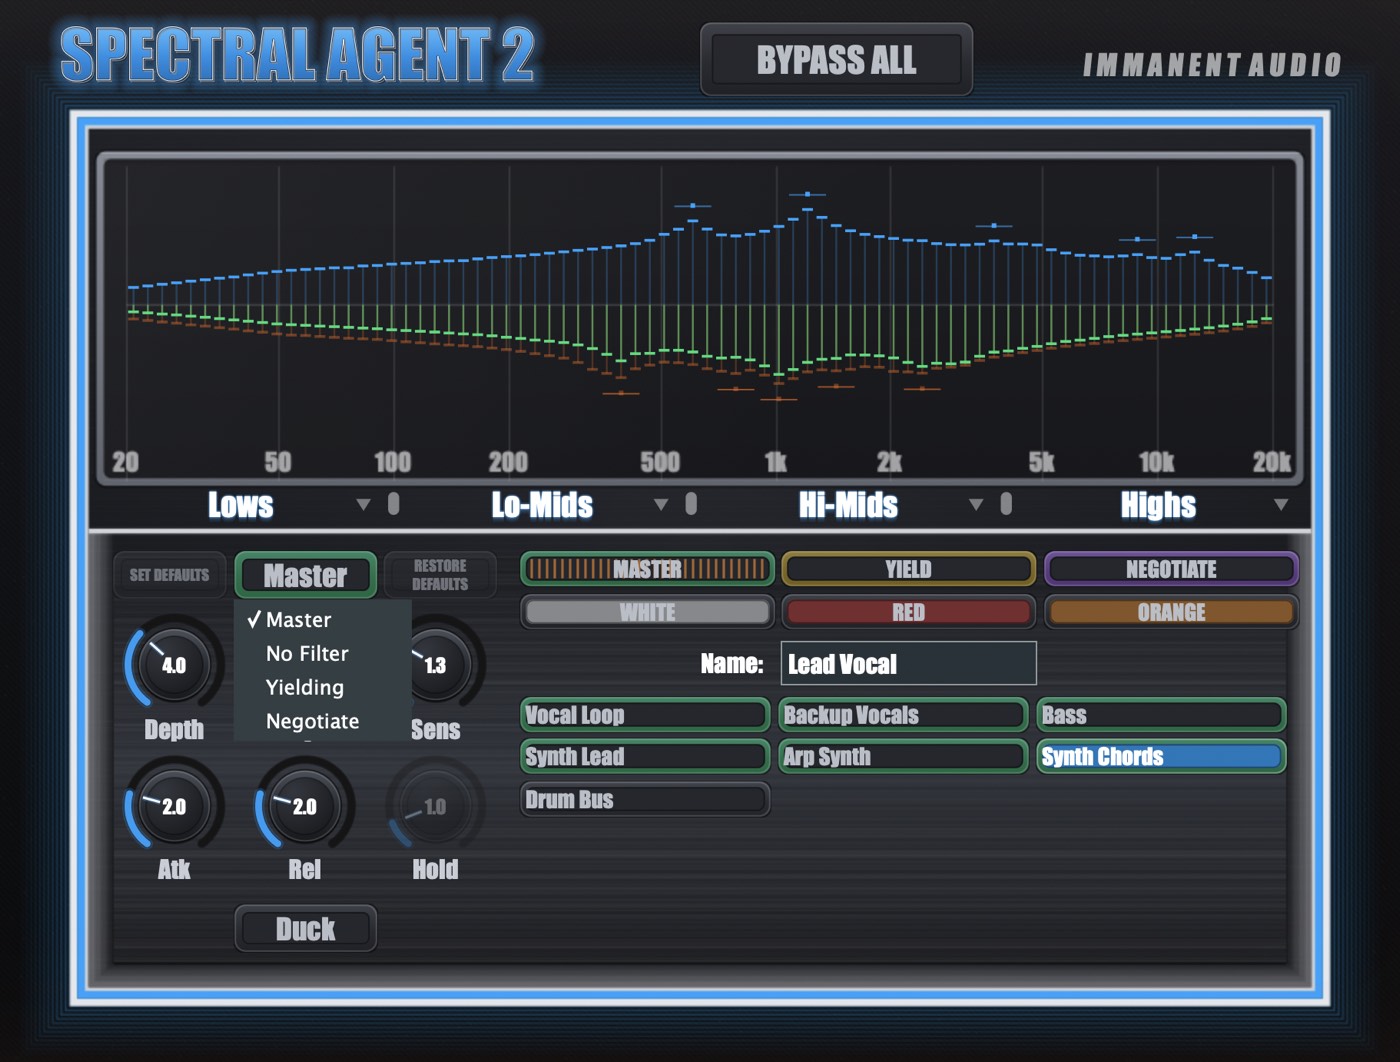
A mode is not a property of a track — it is a property of a pair. Select a track button in the list, then choose the relationship from the dropdown. Each pair retains its own settings.
Master and Yielding are the two ends of one relationship. Setting Master here sets Yielding there. It makes no difference which of the two windows you set it from.
| Mode | This track | The other track |
|---|---|---|
| Master | Untouched | Yields |
| Yielding | Yields | Untouched |
| Negotiate | Splits frequency space | Splits frequency space |
| No Filter | Untouched | Untouched |
- Master makes this track the priority. Its peaks are published and the partner gets out of the way.
- Yielding is the other end of that same relationship — this is the track that moves.
- Negotiate splits the contested range between two equals instead of picking a winner.
- No Filter processes nothing, but still draws the collisions so you can decide what is worth wiring up.
- Ducking is a toggle on top of Master or Yielding, for interference that is rhythmic rather than continuous.
Master
How it works
- This track is the priority. Its peaks are published to the pair, and the partner dynamically yields to them.
- Filters only go in where there is a true frequency “collision,” not just anywhere there is a Master peak.
When to use it
- A lead vocal in a dense mix. This is the case the plugin was built for.
- A kick over a bass (turn on the Duck button for this).
- Anywhere you want to prioritize one track over another.
Notes
- Master is free. Setting one instance as master over six other tracks does not process it at all, so the thing you are protecting stays untouched.
- The knobs belong to the pair, not to the instance. Either side can change them and both see the change.
Yielding
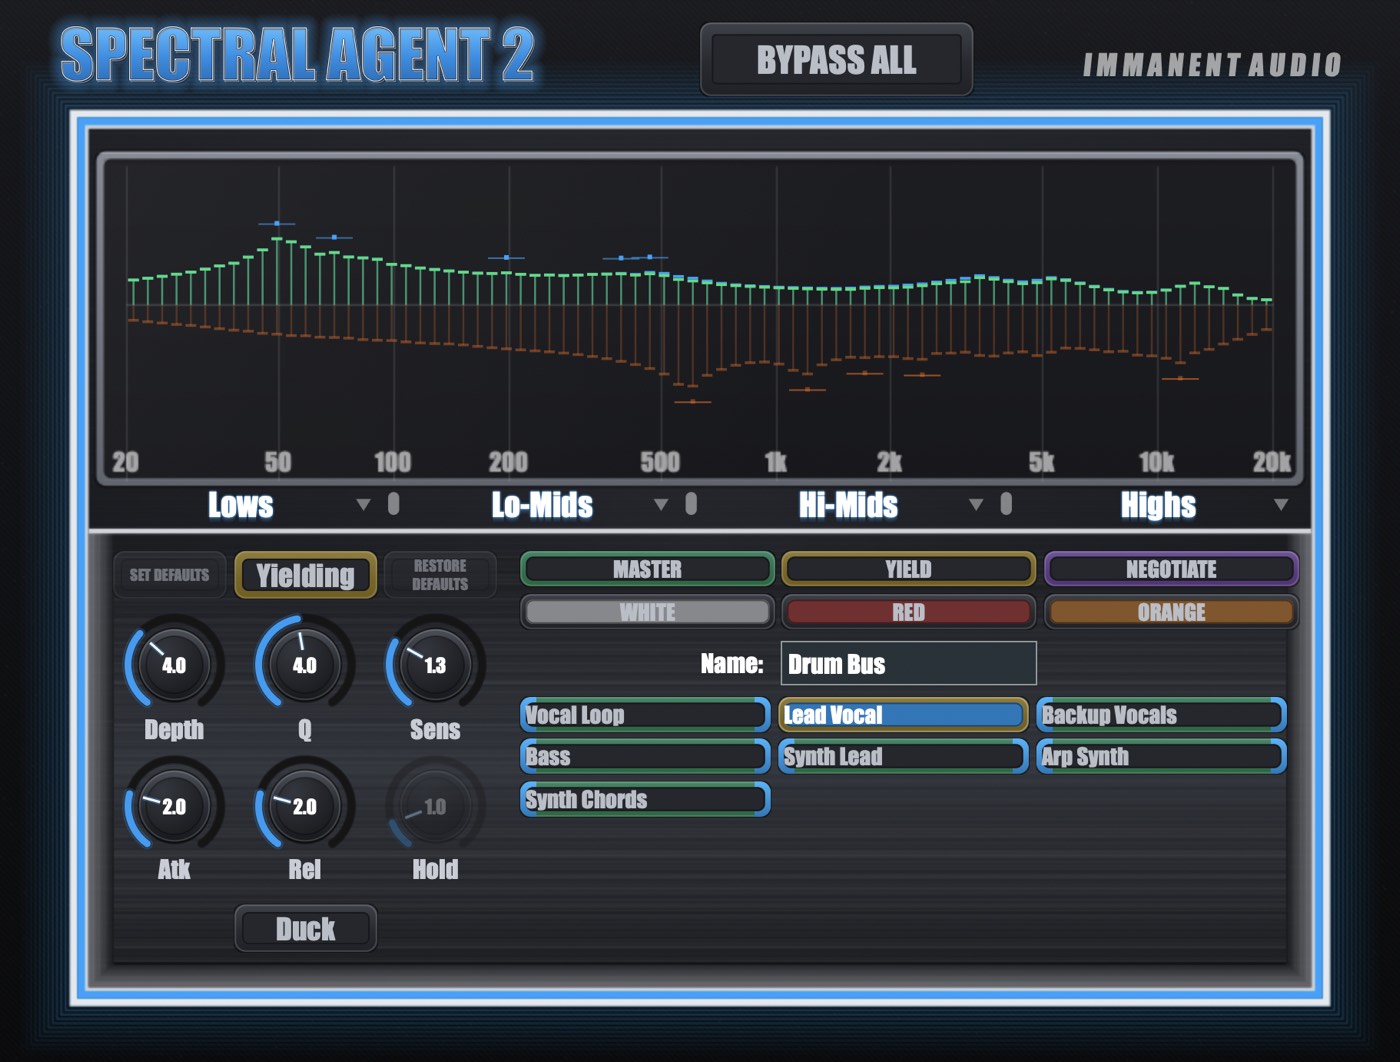
How it works
- The other end of the Master relationship. This is the track that moves.
- Cuts are dynamic and cut only. Between collisions the track sits at unity.
- Each instance has a limited pool of cuts. A weighted priority algorithm determines the most significant cuts to make at any point in time.
When to use it
- When you have a more “background” track that you want to tuck behind a more prominent track.
Negotiate
How it works
- Neither track is the priority. Where the two contest the same range, that range is split into interleaved slices, and each track keeps every other slice at full level while yielding the slices in between.
- The two instances decide which comb each one takes without talking to each other. Each prefers the comb it is naturally stronger in.
- Increasing the Depth knob increases separation.
When to use it
- Doubles, layers, and stacks where neither part should be demoted.
- Two synths in the same register, two background vocal groups, a pad against a keyboard part.
Notes
- Negotiate is symmetric. Setting it on one side sets it on both, and both tracks process.
- A track can negotiate with its double and still yield to the vocal.
- The cuts are tighter than yielding cuts by design, and they stay the same width as they deepen. Deeper means more separation, not a wider hole.
- It is meant to be subtle, to avoid an over-processed feel.
No Filter
How it works
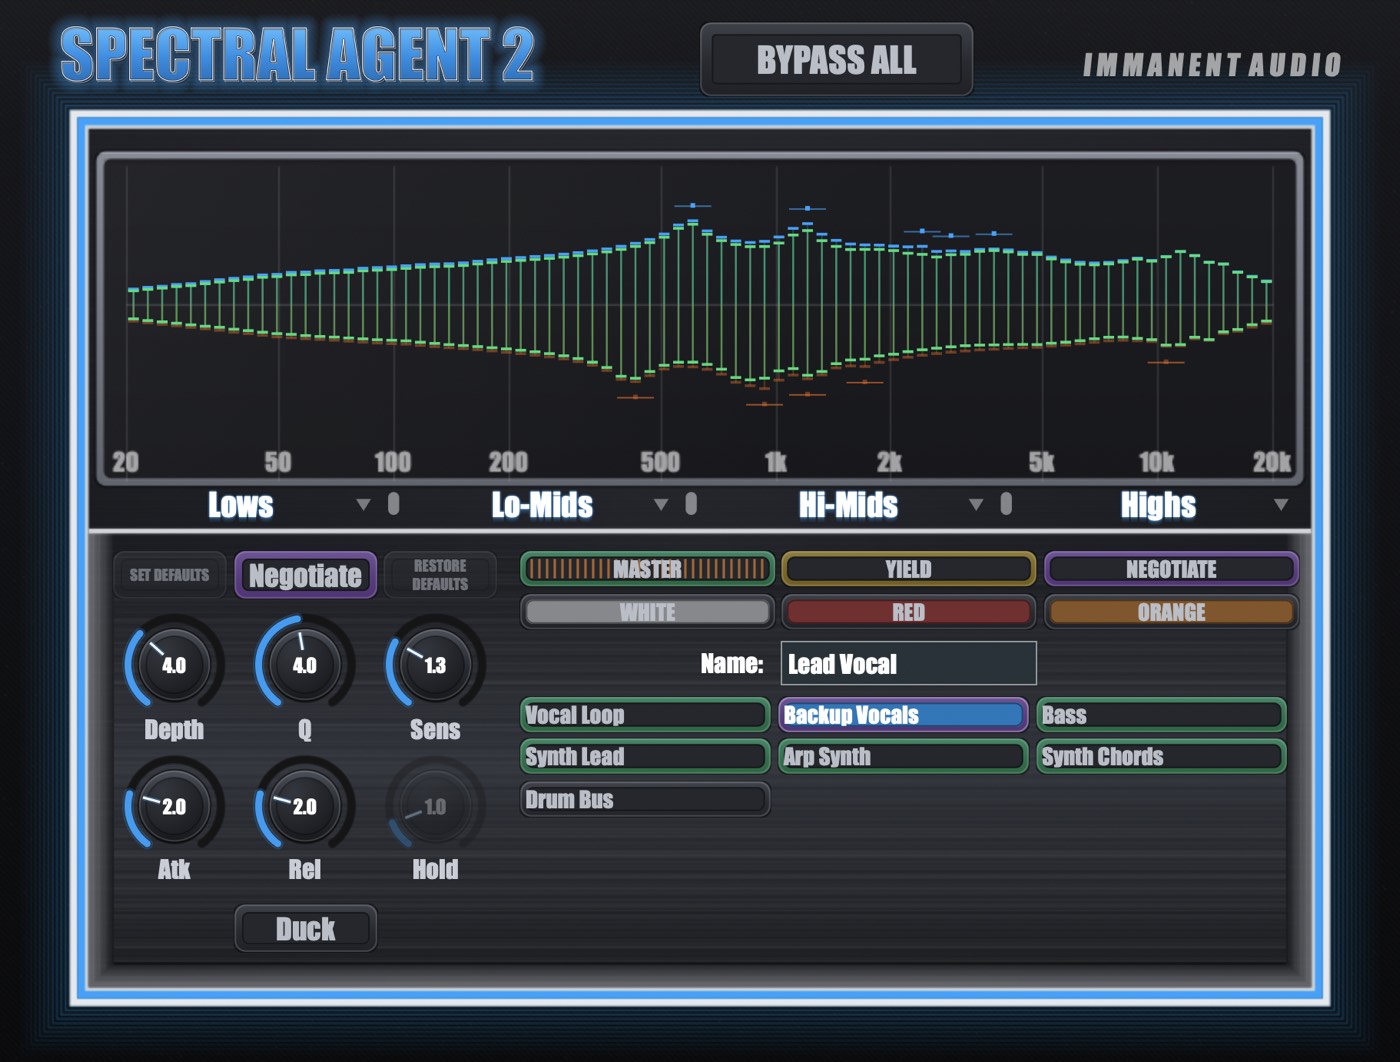
- The pair is off. Nothing is processed in either direction, but the two tracks still draw each other on the analyzer.
- Red vertical lines appear at the frequencies where the two tracks are colliding right now. They are drawn only in this mode, because in the working modes the green output trace already shows the same thing with more accuracy.
When to use it
- As a diagnostic. Use the red collision markers as a visual aid.
Ducking
Ducking is best suited for percussion. When the priority track produces a transient, the yielding track is pulled down in the region that transient occupied, held there briefly, and let back up. It functions as a sidechain that only acts where the hit actually was, instead of across the whole track.
Duck is a separate toggle rather than a fifth mode. It changes how a Master or Yielding pair responds, not who is the priority.
How it works
- The priority track publishes its band energy continuously. The yielding side detects the onset, works out which band it landed in, and opens the duck there.
- The duck is a predefined envelope to match transients. This envelope can be modified using the knobs. The Hold knob becomes active for this mode to allow for longer transients to play out.
- The low band behaves differently from the rest on purpose. It is wider and slower, so the bass audibly swells back in behind each kick. Everything above it keeps the tighter behavior that stops the mids from pumping.
When to use it
- Kick and bass. Set the drums as Master over the bass, and turn Duck on.
- Snare against rhythm guitars or keys.
Notes
- The Duck button sets all four bands at once. Individual bands can be overridden in the variable EQ band settings.
- Hold is live only while ducking, and it is the only control over how long the duck stays down.
The controls
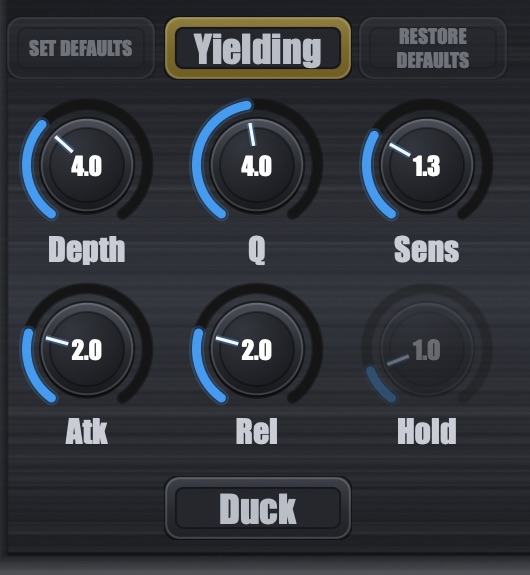
Everything in the control panel belongs to the pair currently selected in the track list, not to the instance itself. Select a different track and all six knobs re-point. Select a group instead and the same six knobs become multipliers.
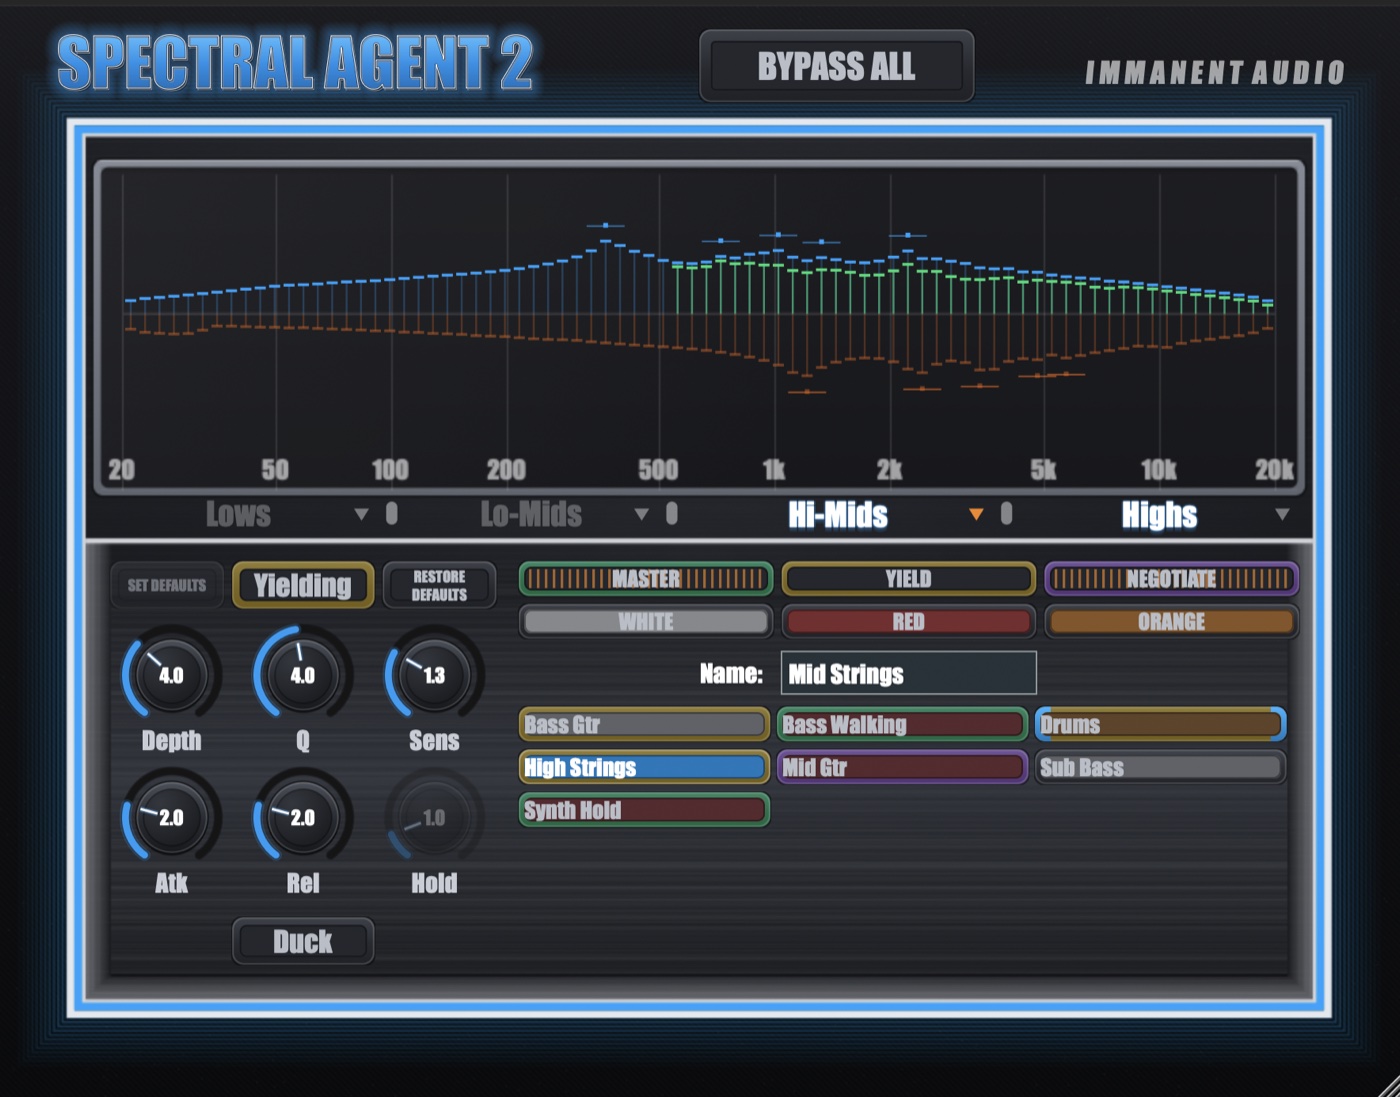
Name
The name this instance publishes to every other instance. Most hosts hand the plugin the DAW track name automatically. Type over it if yours does not.
The track list
Every other instance in the session. Click once to select it. Double-click cycles the mode. The button outline color shows the role, and a blue strip on the ends marks a pair that is ducking. Interior button color shows custom group membership.
Mode button
Shows the selected pair's role and opens the dropdown of the four modes. It reads N/A when nothing is selected, because a mode only means something in the context of a pair.
Depth
How deep the cuts go.
Q
The width of each cut. Low values are broad and gentle, high values are surgical. A broad cut moves more of the track out of the way but is easier to hear as a tonal change. A narrow one is more transparent but only clears the exact frequency that was fighting.
Sens
How closely the two tracks have to agree in frequency before it counts as a collision. Widening it fires more cuts, narrowing it fires fewer and only on direct hits. If you can hear the clash but nothing is triggering, increase this knob. If it is grabbing at things that are not really fighting, reduce it.
Atk and Rel
These knobs act as multipliers on the default values across the spectrum, but they functionally work exactly how you'd expect. Atk and Rel were handpicked, and they are not constant between lows/highs. By default, higher frequencies hold higher Atk/Rel values.
Hold
Ducking only, and greyed out otherwise. How long a duck stays at full depth before it starts to release. Longer holds keep the space open behind a hit.
Duck
Makes the yielding cuts fit a predefined ducking envelope. Envelope can be tweaked. See Ducking above.
Set Defaults and Restore Defaults
Set Defaults allows you to set your own knob defaults for the project. Restore Defaults will reset knob and EQ band settings back to initial states.
Bypass All
Global. It bypasses every instance in the session from any window.
The analyzer
- Blue curve is the current track, and red curve is the selected button's frequency data.
- Blue and red are pre-processed, green is post-processed.
- Red vertical lines appear only in No Filter, and mark where the two tracks are colliding.
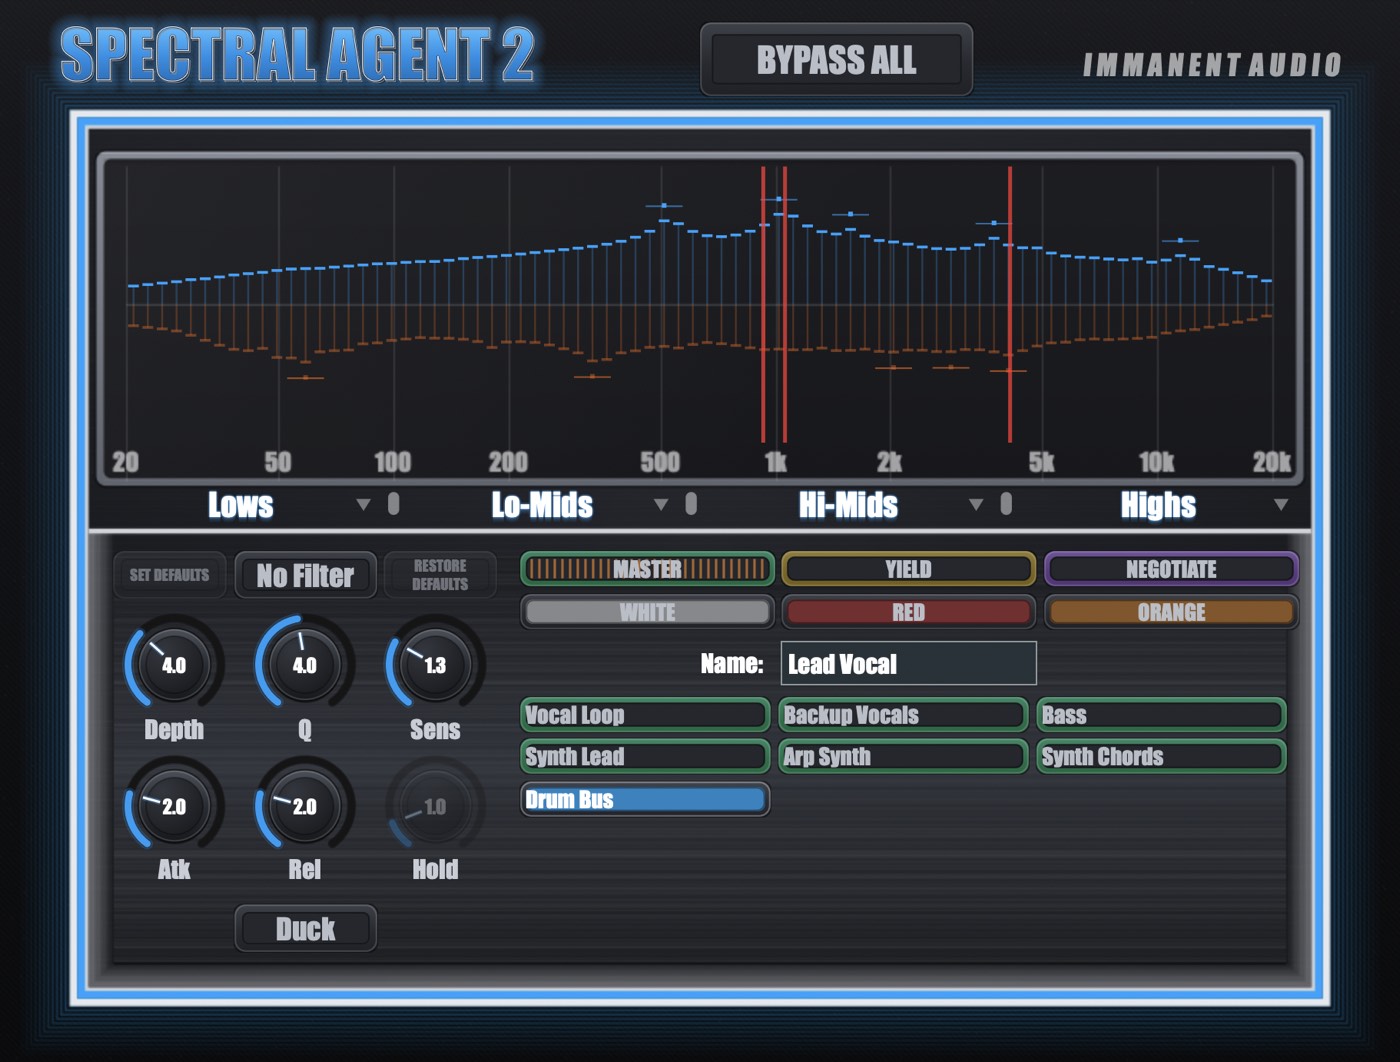
The dynamic EQ bands

The spectrum is divided into four bands: Lows, Lo-Mids, Hi-Mids and Highs. Each pair holds its own dynamic EQ band settings.
- Click a band name to switch that band on or off for the pair.
- Drag the handle between two names to move that crossover.
- Click the small arrow by a band name to open its panel. The six sliders are multipliers on the pair's settings for that band alone, and the Duck button routes that band and nothing else.
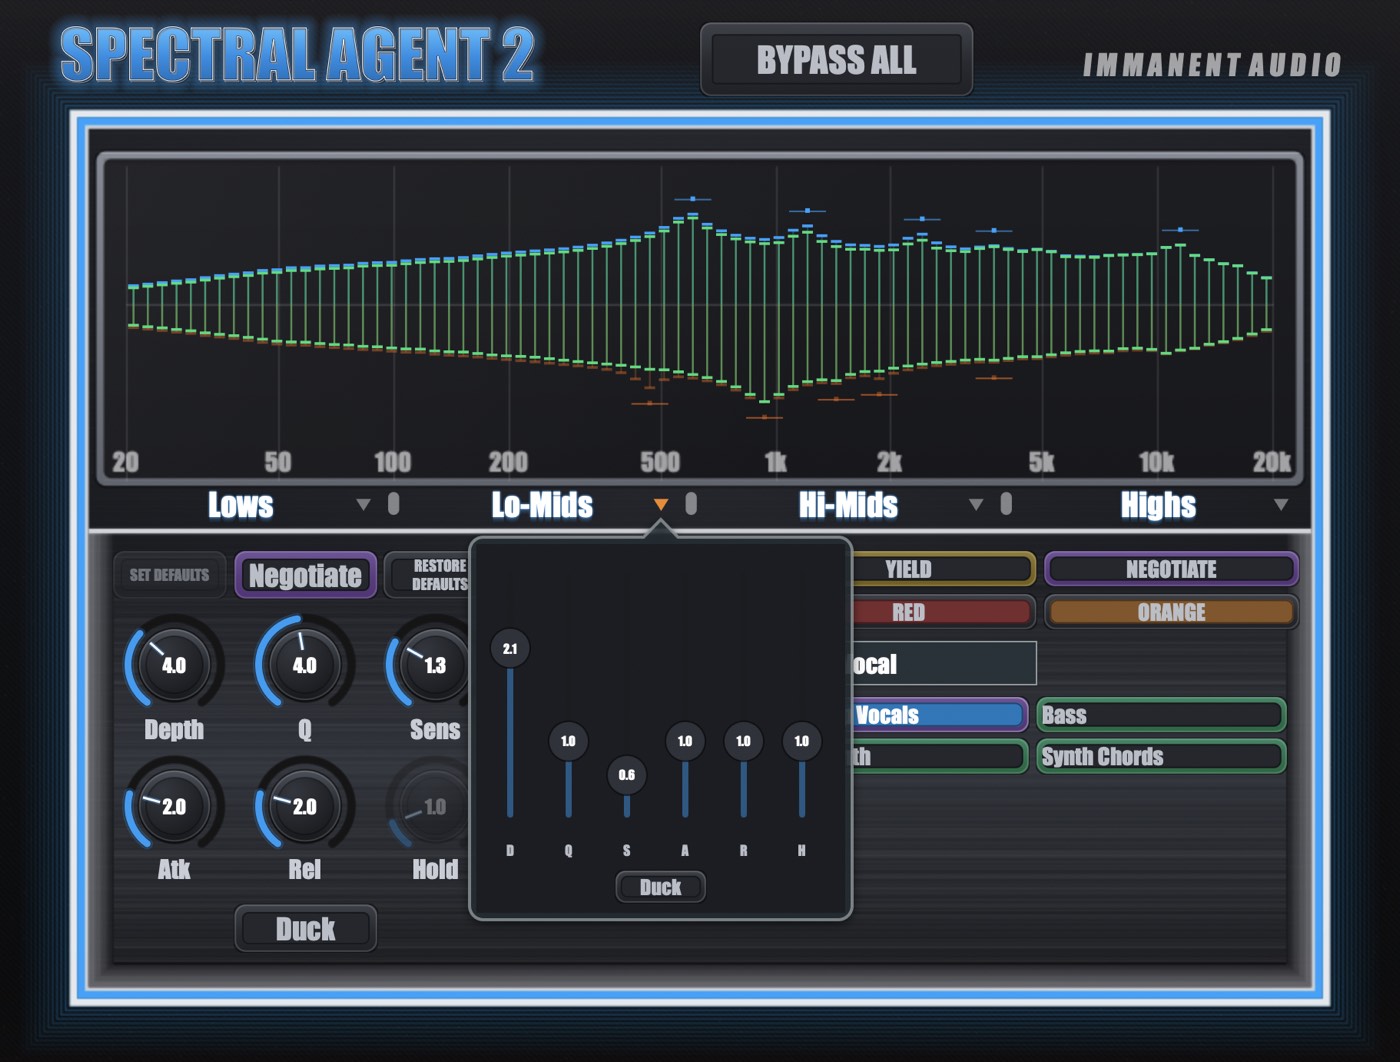
This is how one relationship covers more than one problem. A vocal and a guitar might want deep narrow cuts through the mids, a light touch in the highs and nothing at all in the lows. A kick and a bass want ducking in the lows and ordinary collision cuts everywhere else.
The groups
A group is how you move a lot of relationships at once. Click a group button and the six knobs stop being pair values and become multipliers on that parameter for every pair in the group. One times is neutral.
- The top row is automatic. MASTER, YIELD and NEGOTIATE hold every pair that currently has that role. You do not assign them.
- The bottom row is custom. Select WHITE, RED or ORANGE, then click track buttons to add or remove them.
- Duck All toggles ducking for every pair in the group at once.
- Multipliers stack. A pair that is in both the Yield group and the Red group gets both, on top of its own knob value and any band multiplier.
- Every group knob is a DAW automation parameter. This is where the core automation functionality lives.
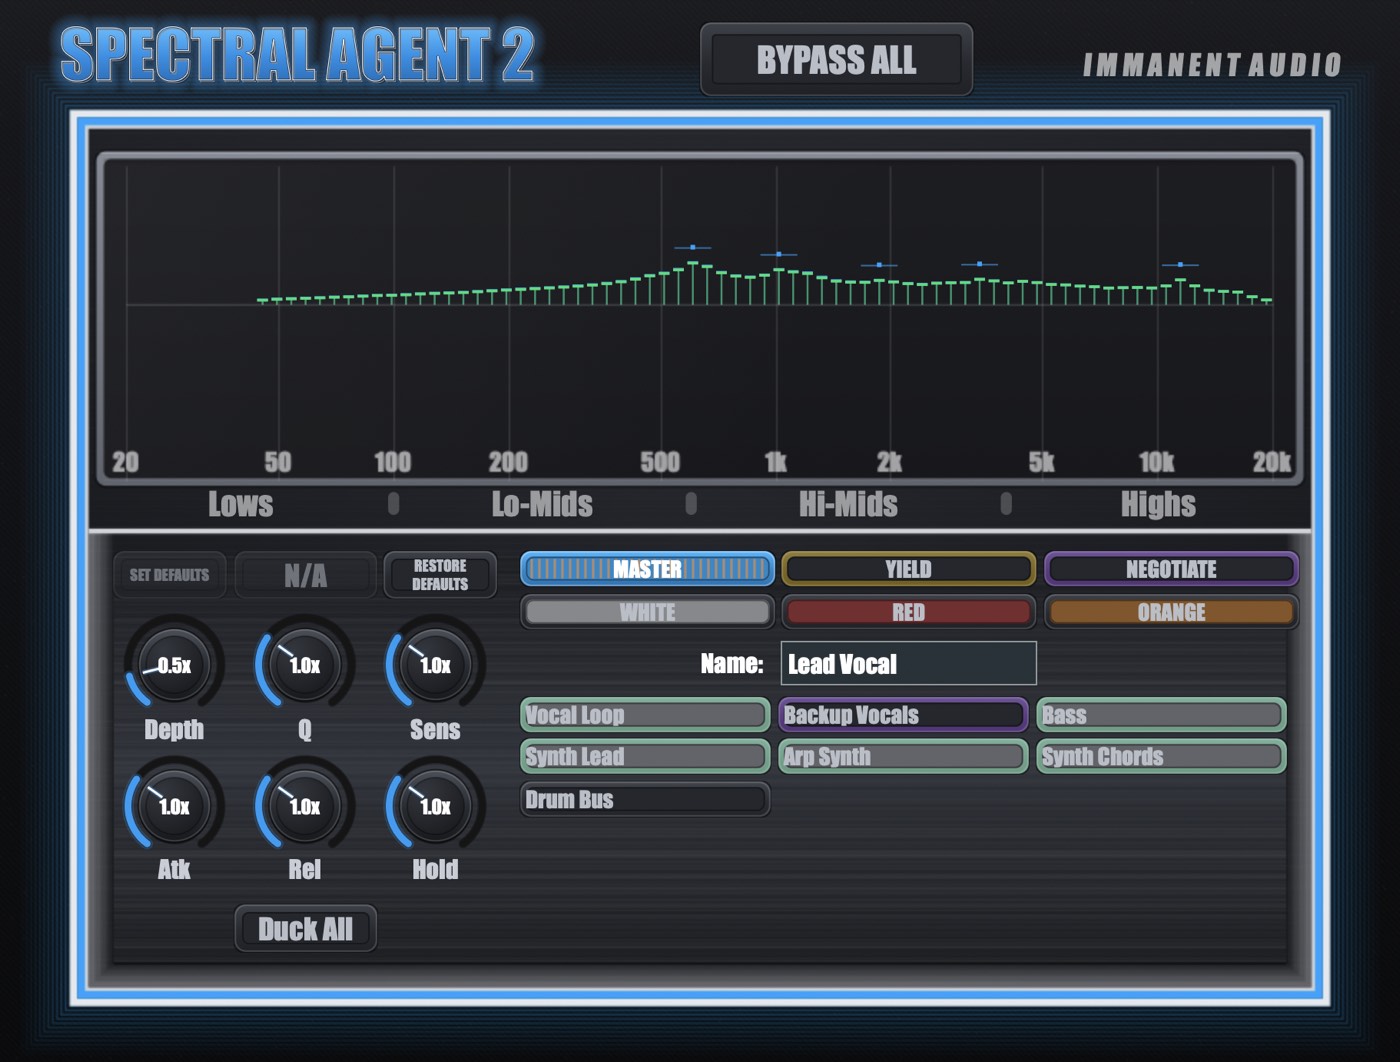
Custom group Depth goes below zero
On the three custom groups only, Depth runs through zero into negative values. Zero is no cut in either direction. Below zero the relationship reverses: the track that was yielding stops cutting and the priority track carves itself against the partner instead, at whatever strength you have dialed in. Because the travel is continuous, automating that lane from positive through zero to negative crossfades a track from Yielding to Master smoothly, with no mode change.
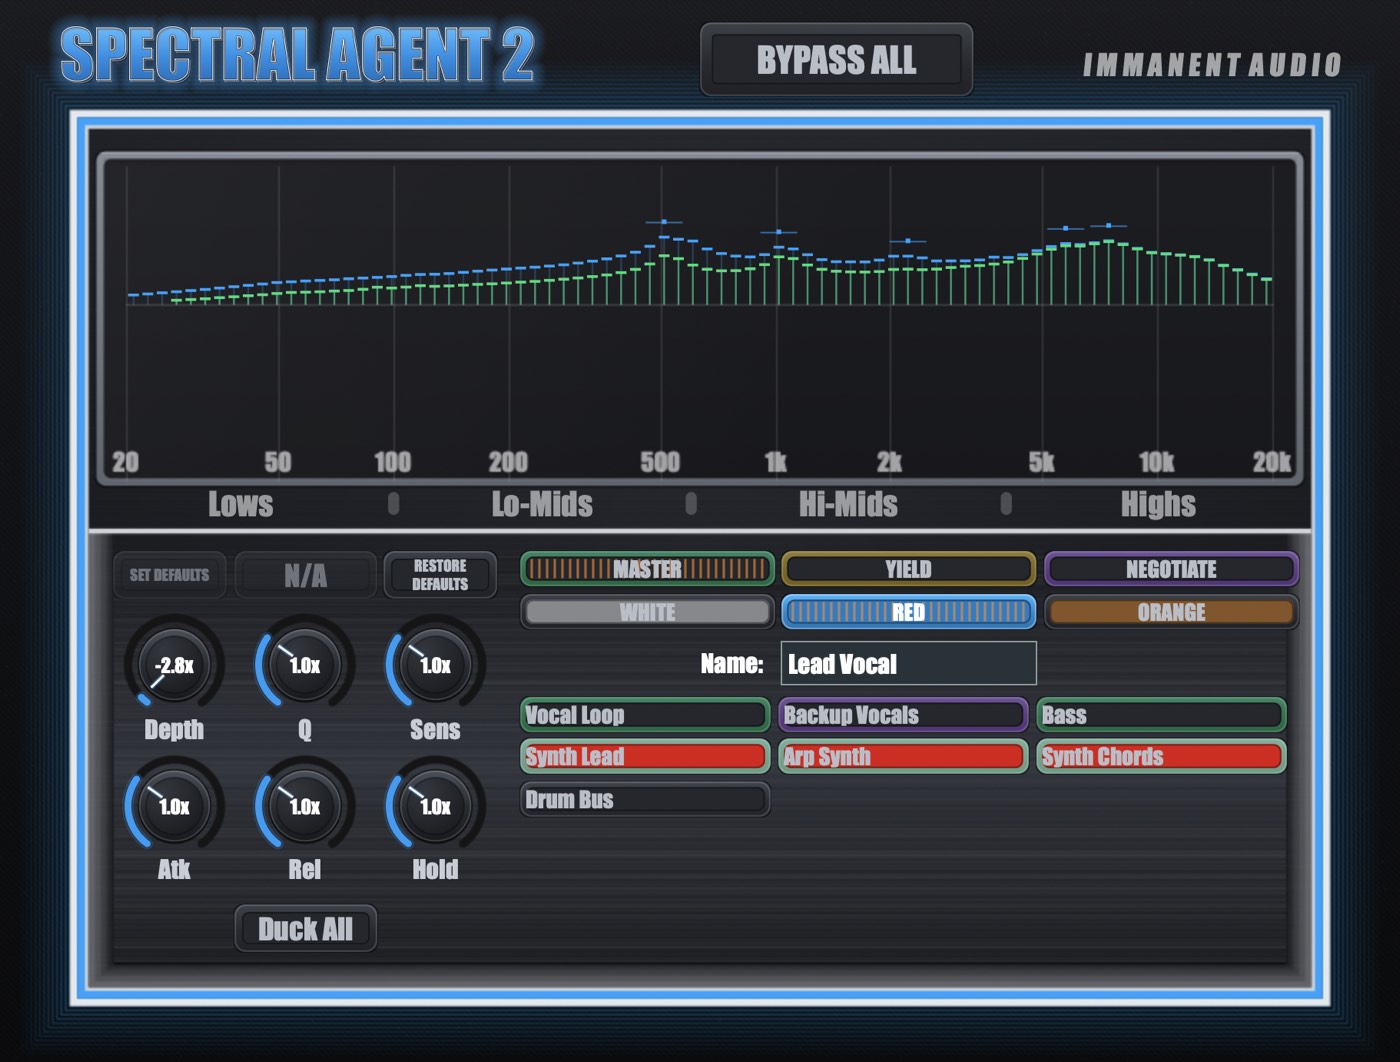
Tips
Depth is the crucial knob
Choosing the right pair and the right mode is nearly all of the work. Depth is the only control most pairs need after that.
Build outward from the essential tracks
An instance set as master over eight tracks does not process its own track at all. Put one on the lead vocal, make it master over everything that crowds it, and the mix opens up around the vocal without a single filter on the vocal.
Use No Filter to decide what is worth wiring up
Select a candidate track, leave the pair in No Filter, and watch the red lines while the section plays.
Sens is a frequency window, not a threshold
If nothing is triggering but you can hear the clash: widen it. If it is reacting to things that are not really fighting: narrow it. The notches are not level-dependent.
Automate for dynamic parts
Have a guitar solo in the bridge, but that guitar has been yielding the whole song? Use the custom groups to automate that guitar into the forefront by reversing the depth into negative values.
Spectral Agent 2 is $25 — VST3 and AU, macOS and Windows, with a free demo. Back to the plugin page.