Overview
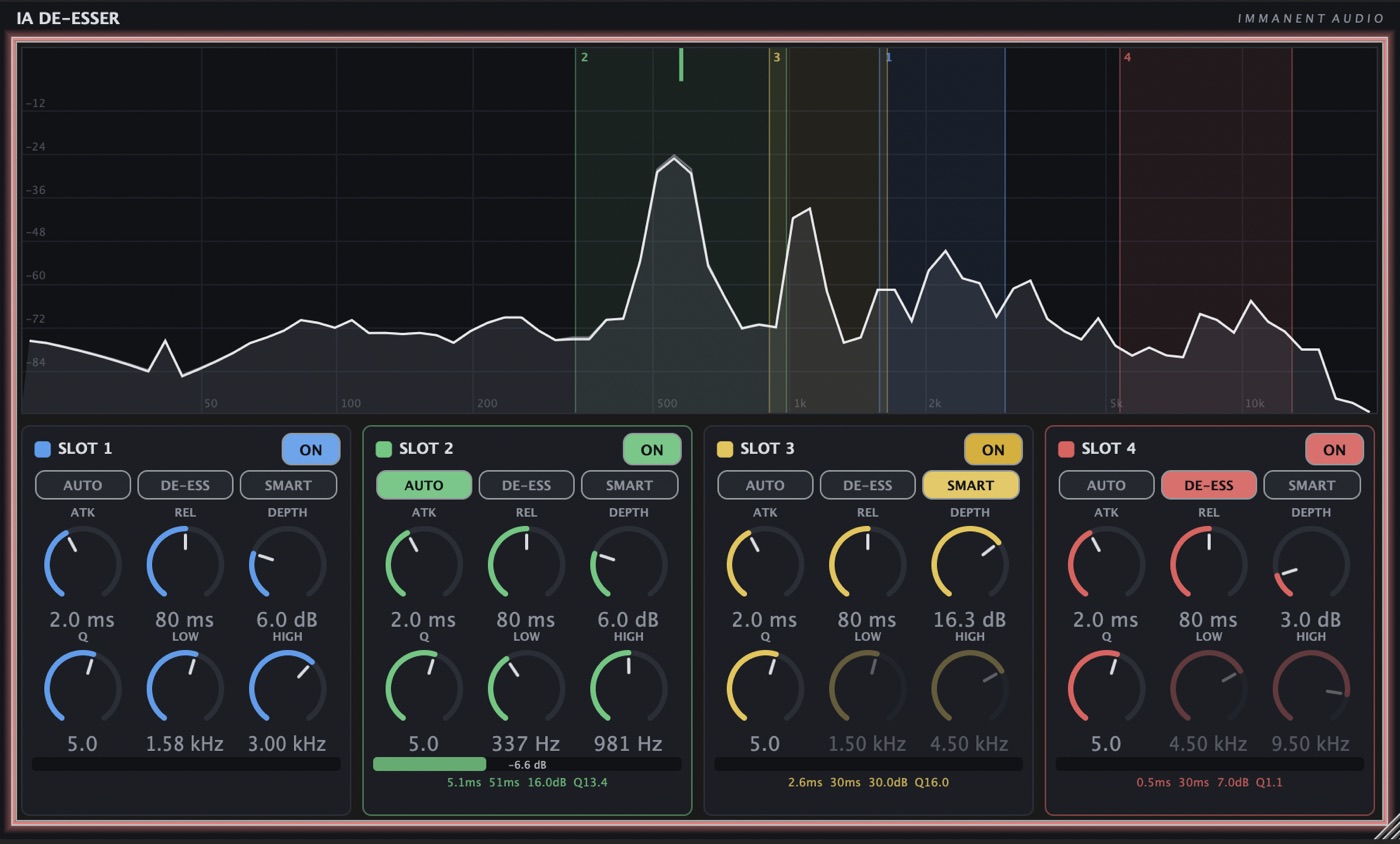
IA De-Esser is four independent slots. Each slot is one bell shaped cut that sits at unity gain doing nothing until the frequency range it is watching gets too loud, then pulls that range down by as much as it overshot and lets go again.
- Nothing is cut when nothing is wrong. Between esses, and between resonant notes, every slot is transparent.
- It is level-independent. Detection is relative to the rest of the signal, not to a fixed threshold. Changing the fader, the mic distance or the gain staging ahead of it does not change how much it cuts.
- It reports zero latency. No lookahead, no FFT in the audio path. Safe to record through, monitor through and use live.
The four modes
Every slot has four modes. Three are the buttons AUTO, DE-ESS and SMART. The fourth is full manual, which is what you get when none of the three are lit.
| Mode | You set | The plugin sets |
|---|---|---|
| SMART | Nothing | Where the problems are, plus width, depth and timing |
| DE-ESS | Nothing | The sibilance band for this voice, plus everything about the cut |
| AUTO | The frequency range | Exact frequency, width, depth and timing inside it |
| Manual | Everything | Only when to move, and where inside your range |
- SMART hunts the whole spectrum on its own and parks the slot on the worst thing it finds. Best place to start.
- DE-ESS measures where the sibilance actually sits on this particular voice and tracks it.
- AUTO works inside a range you set with LOW and HIGH, and decides everything else within it.
- Manual is all yours: range, width, depth and timing, as absolute values.
When to use the plugin
Harsh vocals and sibilance, boxy or honky recordings, resonant acoustic guitars, room modes, ringing snares, cymbals and hi hats, dialogue and voiceover. Anything that sounds fine most of the time and unbearable on a few notes.
Getting started
- Insert it and turn on SLOT 1.
- Press SMART and play the loudest, harshest section.
- Watch the colored band that appears on the analyzer. That is where the plugin thinks the problem is, and the meter under the knobs shows how hard it is working.
- Turn on more slots in SMART if there is more than one problem. They spread out and never double up on the same spot.
- For more or less of the effect, turn DEPTH. Everything else can stay put.
The controls
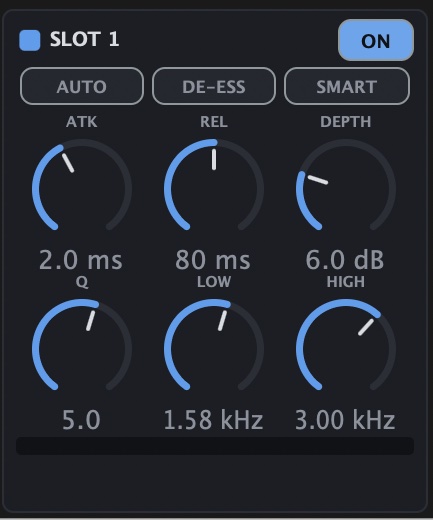
Each slot has an ON switch, three mode buttons and six knobs. Every slot is identical.
ON and the mode buttons
ON engages the slot. The mode buttons can be armed while a slot is off, so you can set a mode up before you engage it. AUTO, DE-ESS and SMART are mutually exclusive: clicking one clears the others, and clicking the lit one turns it off, which drops the slot back into manual.
LOW and HIGH
40 Hz to 20 kHz. These define the region the slot watches and the range the bell is allowed to move inside. They gray out in DE-ESS and SMART, because those modes find the region for you.
DEPTH
0 to 24 dB, default 6 dB. How hard it cuts. The default is the neutral point, where the cut simply tracks how far the band overshot. Turn it up and it cuts more than proportionally, turn it down and it cuts less. There is also a ceiling on any single event, so one stray transient never digs a hole.
Q
0.7 to 18, default 5. The width of the bell. Low numbers are wide and gentle, high numbers are surgical.
ATK and REL
Attack 0.1 to 100 ms, default 2 ms. Release 5 to 500 ms, default 80 ms. How quickly the cut engages and how quickly it lets go.
The live readouts
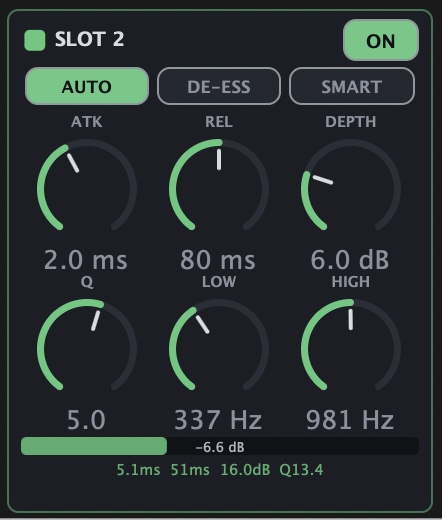
- The gain-reduction meter is the bar under the knobs. It shows how much that slot is cutting right now.
- The auto readout is the colored line under the meter, and it only appears in the auto modes. It is the attack, release, depth and Q the slot is actually running at that instant, after your multipliers have been applied.

The analyzer
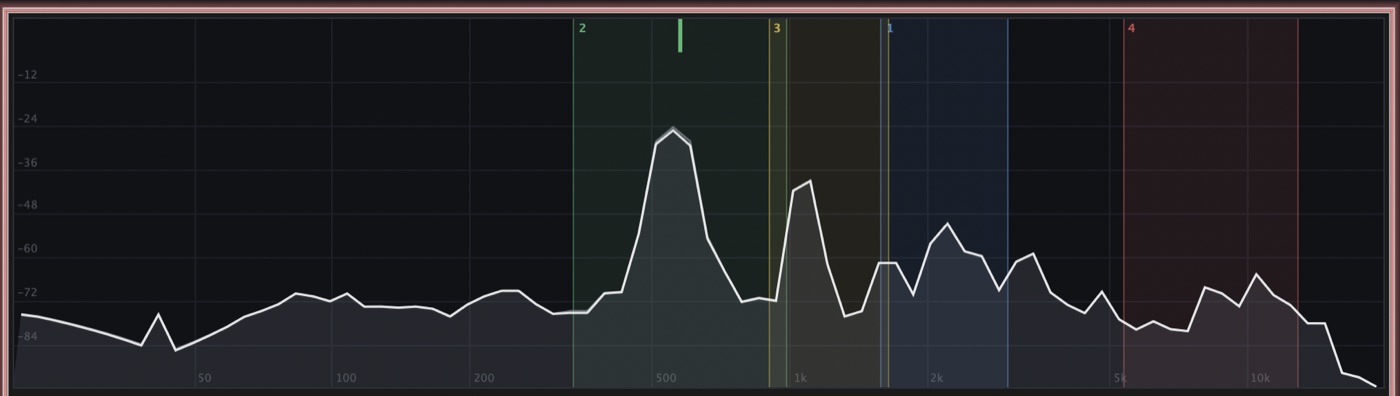
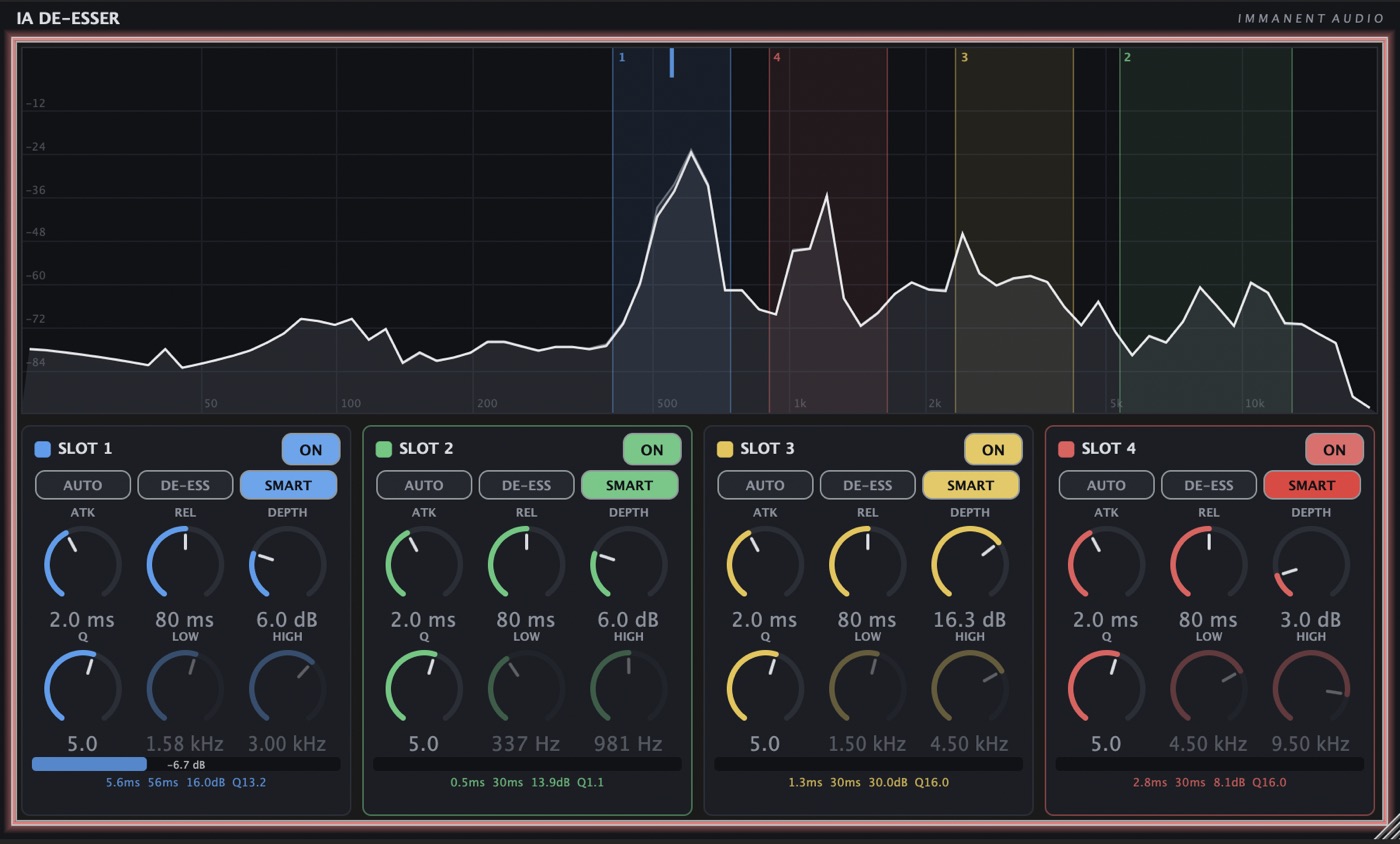
- The gray-filled trace is the input and the white line is the output. Wherever the two separate, that is your cut, drawn at the frequency it is happening.
- The shaded vertical band is an active slot's region, numbered in its top left corner with the slot number.
- The short colored tick hanging from the top sits at the exact frequency that slot's bell is parked on, and its length is the live gain reduction.
Auto mode
You set the territory with LOW and HIGH. The plugin does everything else inside it.
How it works
- Finds the loudest peak inside your region and parks the bell on it.
- Measures that peak's own width and sets Q from it. A narrow ring gets a narrow cut, a broad hump gets a broad one.
- Sets depth from how far the peak stands above the rest of the region, so a tall spike is cut harder than a small bump.
- Scales attack and release to the frequency it landed on, so a low band moves slower than a high one.
- Glides the bell to follow the peak as it moves rather than jumping, and never lets it leave your region.
When to use it
- You know roughly where the problem lives but not exactly what it is, or it moves from note to note.
- Boxiness somewhere in 200 to 500 Hz, nasal honk around 800 Hz to 1.5 kHz, harshness in 2 to 5 kHz.
- Any time you want to set the region and let the plugin handle the rest.
Notes
- If nothing in the region really stands out, the bell parks in the middle of the region and waits.
- Narrow regions detect better than wide ones. Give it several octaves and a single resonance gets lost in the average. Tighten it around the ring and it triggers immediately.
De-Ess mode
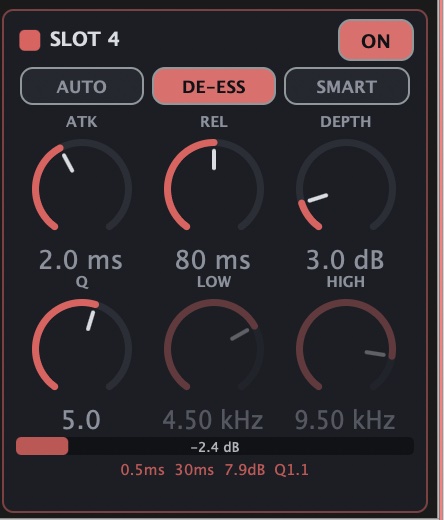
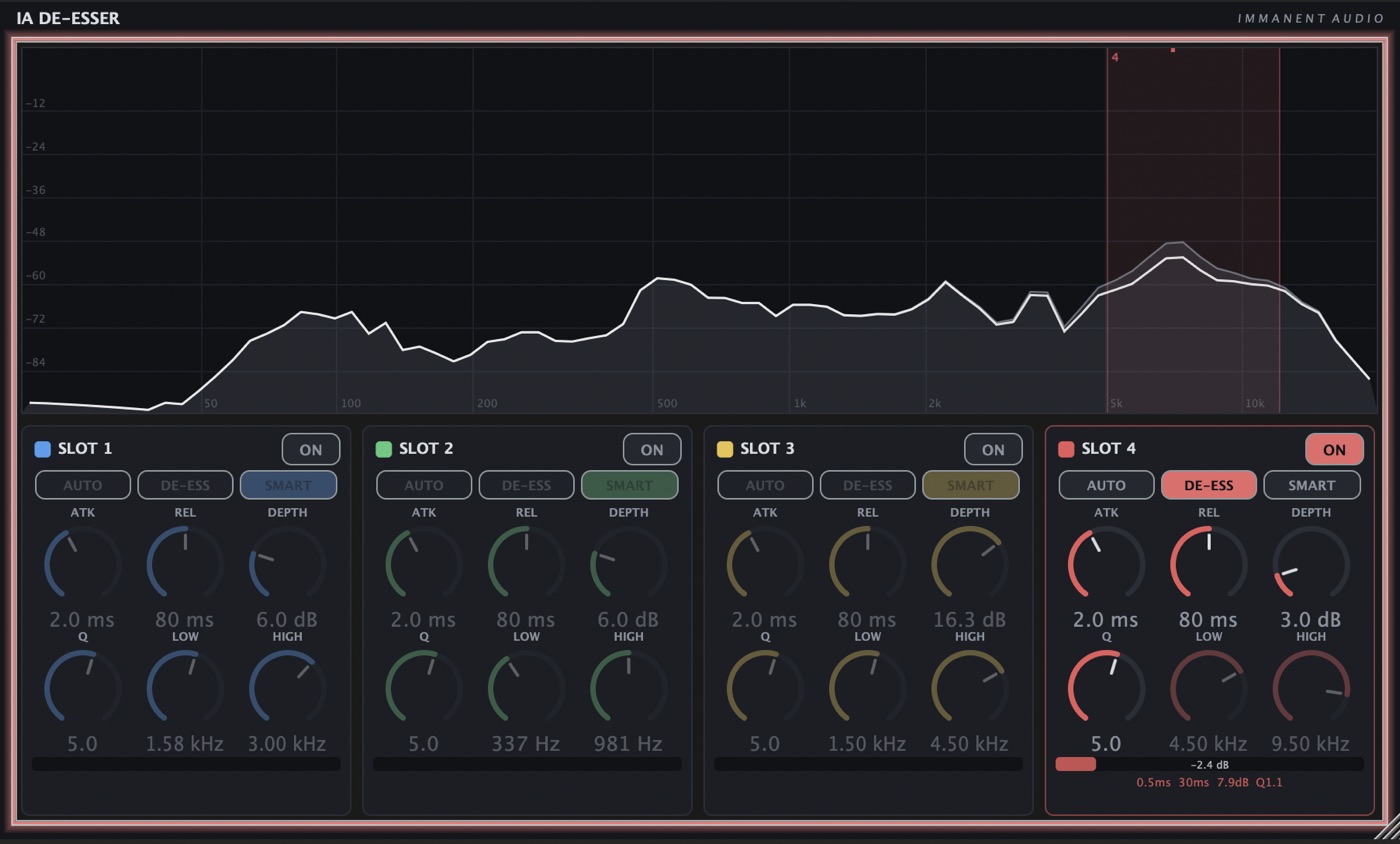
A dedicated sibilance mode. You do not set the band, and it is not fixed at a predetermined frequency either. It is measured from your actual audio, and it follows the voice.
How it works
- Continuously compares the energy up in the sibilant range against the body of the signal, and keeps a running average of that balance for this source.
- Calls it sibilance when that balance jumps well clear of the source's own norm. A naturally-bright singer does not get permanently filtered, only the esses that are hot for that voice get caught.
- Finds the center of the ess by where its energy actually sits, then opens a band around it.
- Uses a broad Q, because sibilance is broadband.
- Runs fast, because high frequencies allow it to.
- Sets depth from how harsh the ess is compared to the running norm.
When to use it
- Lead and backing vocals, doubles, voiceover, dialogue, podcast.
Notes
- LOW and HIGH are disabled, but DEPTH, Q, ATK and REL still work as multipliers, so you can make it gentler, wider or slower without leaving the mode.
- It follows the singer. If a different vocalist comes in, it re-centers on them.
Smart mode
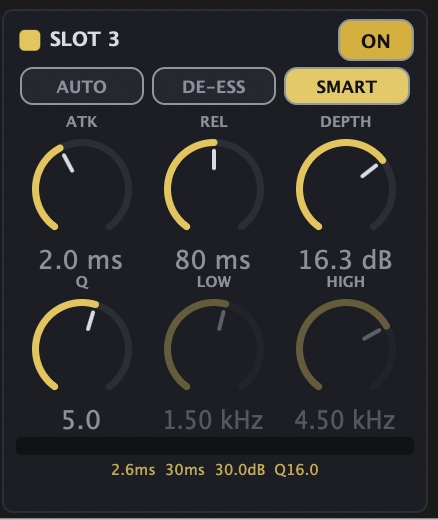
The most hands-off mode. You give it a slot, and it goes and finds the worst thing in the spectrum by itself.
How it works
- Scans the whole spectrum for peaks that stand out above their own local neighborhood, and ranks them by how far they stick out.
- Each SMART slot claims one trouble spot and holds it.
- A slot will abandon its spot for a clearly worse one.
- Claims are exclusive. Slots keep well clear of each other, so four SMART slots land on the four worst spots instead of piling onto one.
- If a claimed peak disappears for long enough, the slot lets go and starts hunting again.
- One SMART slot can take on the sibilance band and behave exactly like DE-ESS, but only if no other slot is already running in DE-ESS. It will not double up on a de-esser you have already set.
When to use it
- If you need help finding the typical resonant areas.
- Unfamiliar material, live sound, broadcast.
- Sources with several problems at once: an over-bright acoustic that also honks, a vocal that is both nasal and sibilant.
Notes
- Turn all four slots on in SMART to see the four worst spots at once. This is the diagnostic pass described in Tips.
Manual mode
No mode button lit. The region, the width, the depth and the timing are all yours, as absolute values.
Manual is still dynamic. It is not a static EQ cut. The slot still watches the band, still only moves when that band gets louder than it ought to be, and still releases all the way back to unity.
When to use it
- You already know the exact frequency and want it treated identically every time.
- You want a specific character: a wide, gentle, slow cut that behaves like a dynamic tilt, or a very narrow fast one that only catches a single ringing note.
- You want to override the parameters the auto modes set.
Notes
- The bell parks on the loudest peak inside your region rather than sitting dead center, so the frequency still tracks the note.
- Detection is still relative, compared to its surroundings.
Tips
Use SMART to find the problems, then hone in
Turn all four slots on in SMART, play the worst section, and watch where cuts go in most often and most intensely. Note those regions. Then switch the slots to AUTO with LOW and HIGH set tightly around what SMART found, or to manual if you want to hand-shape the cut. You get personalized, source-specific cuts.
Set DEPTH first, everything else second
In any auto mode, DEPTH is the master taste control. Many sessions often need nothing else.
Narrow the region if it is not catching
Smaller regions make for more sensitive resonance detection. Widen the region for the opposite problem, when it is catching too eagerly.
Gain stage freely
Because detection is relative rather than threshold based, you can put a fader, a trim or a compressor in front of it and it behaves the same.
Higher sample rates are marginally quicker
Envelope times are identical in real terms at any sample rate, but parts of the engine are tied to the sample clock, so 96 kHz is slightly more agile than 48 kHz. Never slower.
IA De-Esser is free — VST3 and AU, macOS and Windows. Back to the plugin page.